Tuesday, October 28, 2014

Use Your Android Phone’s Camera as a Webcam for Your PC

They used to say “a picture is worth a thousand words”, but a video? We may say that a picture is worth a thousand words, but a video it’s worth more than a million. Honestly speaking, there is a huge difference between a simple call and a video call. A smile, or even a raised eyebrow in a certain context, can change the whole tone and the direction of a discussion, each gesture elucidating the “real” message. No wonder, because our communication is a non-verbal one in the proportion of 93%, and only 7% of it is represented just by words.
Sometimes it happens that we urgently need a webcam. Even if the old webcam is broken, even if we’re far from our home and we really need to video-communicate with someone, we need obviously a webcam. What should we do now? The fastest and safest solution is more obvious than we think and it’s called: the mobile phone. Yeah, you heard it well! Why should we pay a new webcam when we can use our own phone? Due to the fact that the newest mobile phones have a camera with a lot of megapixels, it’s exactly what we need. So, in the next, I will present my new step-by-step tutorial, made it in a very simple way.
What we need:
  • Android mobile phone
  • USB data cable
  • A computer with an internet connection
  • Some software (two for the PC and one for the mobile phone)
The operating principle of this process is based on a video stream, conducted by our phone. The stream is sent to a port (4747 port) of the PC and, using software installed in our PC, the videos are taken and forwarded to chat applications (i.e. Skype, Yahoo Messenger, MSN etc.).
The steps are very simple and if you follow exactly, in less than 5 minutes you will enjoy time using your new personal webcam. So, let’s start!
To use the phone as a webcam, we need an application called ADB. So, first, download this app. It’s free and it can be found on a simple search on google, but about this application and its configuration, we will talk in the following. The other PC application it’s called Dev47Apps. The last application, the one for your mobile phone, it’s called DroidCam (you may download it from Play Store).
Here is the step-by-step tutorial that will help you to use your phone as a webcam:
Step1. Install the ADB (Android Debug Bridge) on your PC.
Step2. Set your phone in debugging mode (this could be possible by opening the next: Settings >> Development >> USB Debugging OR in other cases Settings >> Advanced Settings >> USB Debugging).
Step3. Turn on your phone. Make sure that you have connected the USB cable to both mobile phone and PC.*
*(!Pay attention to the following: when you connect the cable to the PC, if the phone will ask, do not connect it in Storage mode.)
Step4. Download the Application DroidCam (Wireless Webcam) from Play Store (Android Market). Install it on the mobile phone and then start the application. After you start it, you can see a window and the next message “Starting server” on the mobile screen, as you can see on the picture below.
droidcam1(click on the picture if you want to see it better)

Step5. Download the application Dev47Apps (you may google it, it’s a free application) and then install it on your own PC.
Step6. Open the Dev42Apps (after you install it you will discover that it has the same name – DroidCam – as the app downloaded from Play Store for your mobile phone) Client Application on your PC and then choose “Connect to Phone(USB)” option. In the field of Device IP (or Phone IP), enter the IP of your phone.
droidcam2(click on the picture if you want to see it better)
At this moment you can say that your phone works properly like a webcam for any chat application and, even more, you may use it as a security camera for your own safety if you want. In the same application, you can also configure your webcam from the Settings button. Enjoy your new personal webcam!
Don’t be a simple and regular buyer. Every time use your imagination in everything you do and try to turn the impossible into possible. :)

Bootable usb drive using command prompt .iso version

This is an updated version of the previous command prompt post.
This version only requires the iso image file of the windows, a program to mount the image, and Windows 7 or Vista as the operating system.
  1. The first step is to obtain a .iso image file of Windows XP, Vista, 7, 8 is not supported in this method.Bootable USB Example
  2. Now you need to mount the .iso image file with a magic disk, daemon tools or any other mounting program.Bootable USB
  3. The next step is to open the command prompt with administrator rights. Go to start, in the search bar type cmd, and right click the cmd file and select run as administrator.
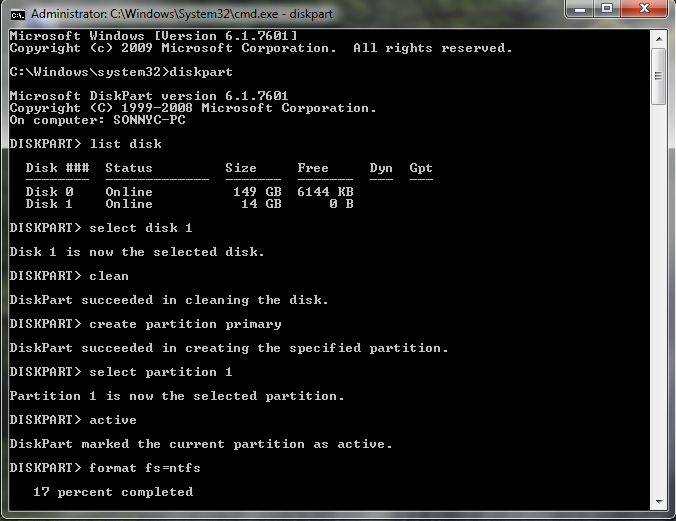
  4. In the cmd program you need to type the following commands: diskpart→list disk→select disk 1(disk 1 is my USB drive, you need to select your USB drive, you will recognize the USB drive by its size)→clean→create partition primary→select partition 1(or 2,3,4 depending on what number is your USB drive)→active→format fs=ntfs→(the formatting process will take about 10-15 minutes).Create Bootable USB
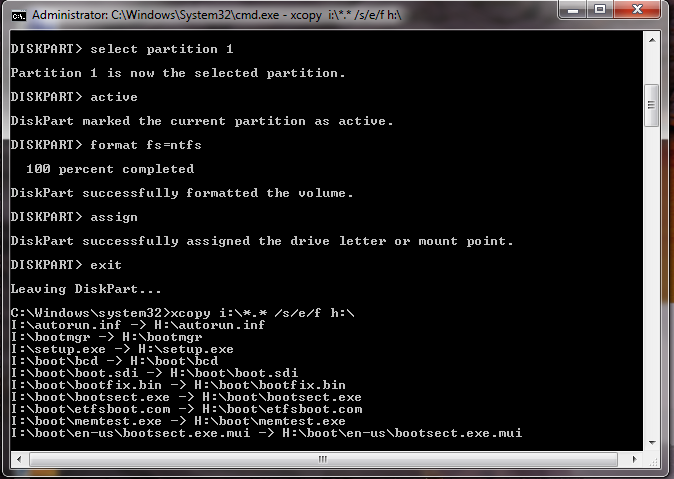
  5. After the formatting process is done you will continue writing commands:→assign(this will usually change the USB drive letter to H or G)→exit(this will exit the disk part but not the cmd)→xcopy i:\*.* /s/e/f h:\→(i is the letter of the mounted .iso and h is the letter of the USB drive where you want to copy the files from i)→Untitled14
  6. This process will take another 10-15 minute.
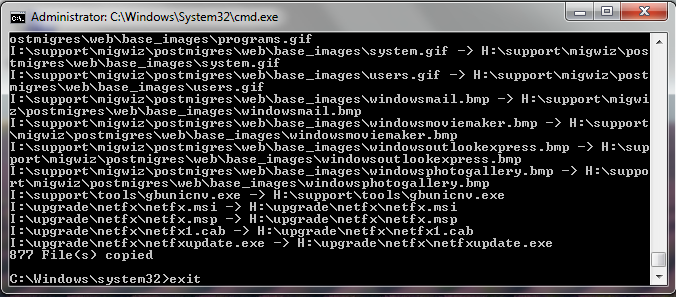
  7. When the copping process is done just type:→exit(this command will exit the cmd)Untitled15
  8. That was all, your USB drive is now bootable.

Install Windows 7 from a USB drive the very easy way

The fastest way to install windows 7 is from a bootable USB drive. You can cut the install time down to around 15 minutes compared with 30-40 via DVD if you use a fast drive.
People still asking me to explain what is the best way to do this as many of the guides online are too complex, or require third party software which doesn’t always work as they supposed to.
With this bootable USB guide, all you need to ensure is that your motherboard supports USB booting, and this is a common feature now for most of the computers.
Today I am going to publish a step by step guide which works perfectly and doesn’t require any additional tools – I have been doing it for some time now to create bootable Windows install drives.
You need to get hold of a fast USB 2.0 flash drive. It doesn’t need to be 32GB or bigger,however, all you need is a 4GB unit. The faster it is, the better.
What you need:
– Windows 7 DVD install disc or ISO image
USB Drive (4GB+ and as fast as you can get)
– Running Windows Operating system
– Working set of hands and eyes
– A few minutes of your life
Plug in your USB drive in the USB port:
Usb Drive Plugged
Before going any further, make sure you have removed any important files on your drive to a safe location, what we are about to do next is to erase the entire contents of the drive.
Insert your DVD of Windows 7 into the computer, but don’t start the normal install process.
Open your ‘My Computer’ and make a note of the drive numbers of both the USB drive and the DVD drive with Windows 7 files on it.
Usb And Computer Drives

As you can see from the image above, the DVD drive is drive has letter D assigned and the USB drive is E.
Open the command prompt with admin rights. Type cmd in Start menu search box and hit Shift+Ctrl+Enter.
To keep things really easy, if you see text in upper case, it means this is what you type into the command prompt (you don’t need to type in upper case).
cmd-prompt-usb-bootable

Next type
DISKPART
this loads the diskpart application we need to proceed
Then type
LIST DISK
the image above shows our 32 GB USB drive is listed as DISK 2
so you have to type
SELECT DISK 2 (your USB Drive may have a different number, don’t follow exactly this text it depends on your usb drive)

You will get a successful response “Disk 2 is now the selected disk”
Clean Cmd USB Drive
Next we want to clean the USB drive
Type:
CLEAN
you will get a successful response ‘DiskPart succeeded in cleaning the disk”.
Clean USB Drive

After the drive is cleaned follow the list in the image above (detailed below in list order) – you can also note the successful text responses from the OS as you enter each command.
SELECT DISK 2 (or what number your USB drive has)
CREATE PARTITION PRIMARY
SELECT PARTITION 1
ACTIVE
FORMAT FS=NTFS
Formatting can take a little time depending on the size of the drive, our 32GB unit took about 10 minutes to format - you will see a percentage readout until it is finished.
Bootable USB Final Cmd Prompt
Next type:
ASSIGN
EXIT (DISK PART will exit)

Type D: CD BOOT (substitute the “D” if necessary with the letter of your Windows 7 DVD drive)
then key
CD BOOT
then
BOOTSECT.EXE /NT60 E: (substitute the “E” if necessary with the letter of your now ready USB drive) – we are telling the system to create a boot sector file on the USB drive.
Now you can exit the command prompt and copy all the files on the Windows 7 DVD to the USB drive.
Once this step is finished you’ll be ready to boot from this drive, all you need to do is configure your motherboard bios setup to boot first from USB rather than hard drive or optical drive. If you don’t know how to do this, refer to your specific motherboard manual or search the internet.
Now, Windows 7 installation should take between 40% and 60% of the time it does from the DVD disc.

Friday, October 24, 2014

How To Change Your Multi-Location IP Using Batch File

This file only work at Windows 7 And Windows 8

Please Copy the bellow command in notepad and save this file as a .bat file like (IP Changr.bat) and Change The IP series as your location wise and save.

....
Copy This  Bold Maintion File..........................

"
@echo off

::: Note ::::
echo Please make sure you are starting this batch script as an Administrator.                           

:START


Echo Select the no
ECHO 1 Conclave
Echo 2 Swabhumi
Echo 3 CCSL
Echo 4 Vishwakarma
Echo 5 CCNT
Echo 6 Ecohub
Echo 7 Upohar
Echo 8 Siliguri
Echo 9 raipur
Echo 0 Quit


set /P c=Do you want to switch to connection ? Plz Type Your Location Code and then Press Enter.

:::: Choice ::::

if /I "%c%" EQU "1" goto :ConnectionOne
if /I "%c%" EQU "2" goto :ConnectionTwo
if /I "%c%" EQU "3" goto :ConnectionThree
if /I "%c%" EQU "4" goto :ConnectionFour
if /I "%c%" EQU "5" goto :ConnectionFive
if /I "%c%" EQU "6" goto :ConnectionSix
if /I "%c%" EQU "7" goto :ConnectionSeven
if /I "%c%" EQU "8" goto :ConnectionEight
if /I "%c%" EQU "9" goto :ConnectionNine
if /I "%c%" EQU "0" goto :ConnectionZero

goto :Exit

:::: Variables ::::

:ConnectionOne
set varip=192.168.1.100
set varsm=255.255.255.0
set vargw=
192.168.1.3
set vardns1=
192.168.1.9
set vardns2=
192.168.1.10
goto :Start

:ConnectionTwo
set varip=
192.168.2.216
set varsm=255.255.255.0
set vargw=
192.168.2.3
set vardns1=
192.168.2.9
set vardns2=
192.168.2.10
goto:Start

:ConnectionThree
set varip=
192.168.3.216
set varsm=255.255.255.0
set vargw=
192.168.3.3
set vardns1=
192.168.3.9
set vardns2=
192.168.3.10
goto :Start

:ConnectionFour
set varip=
192.168.4.216
set varsm=255.255.255.0
set vargw=
192.168.4.3
set vardns1=
192.168.4.9
set vardns2=
192.168.4.10
goto:Start


:ConnectionFive
set varip=
192.168.5.216
set varsm=255.255.255.0
set vargw=
192.168.5.3
set vardns1=
192.168.5.9
set vardns2=
192.168.5.10
goto :Start

:ConnectionSix
set varip=
192.168.6.216
set varsm=255.255.255.0
set vargw=
192.168.6.3
set vardns1=
192.168.6.9
set vardns2=
192.168.6.10
goto:Start


:ConnectionSeven
set varip=
192.168.7.216
set varsm=255.255.255.0
set vargw=
192.168.7.3
set vardns1=
192.168.7.9
set vardns2=
192.168.7.10
goto :Start

:ConnectionEight
set varip=
192.168.8.216
set varsm=255.255.255.0
set vargw=
192.168.8.3
set vardns1=
192.168.8.9
set vardns2=
192.168.8.10
goto:Start


:ConnectionNine
set varip=
192.168.9.216
set varsm=255.255.255.0
set vargw=
192.168.9.3
set vardns1=
192.168.9.9
set vardns2=
192.168.9.10
goto :Start

:ConnectionZero
exit

goto:Start

:::: Program ::::

:Start
echo.
echo Setting IP Address [%varip%]
echo Setting Subnet Mask [%varsm%
echo Setting Gateway [%vargw%]
netsh interface ip set address name="Local Area Connection" static %varip% %varsm% %vargw%

echo Setting Primary DNS [%vardns1%]
echo Setting Secondary DNS [%vardns2%]
netsh interface ip set dns name="Local Area Connection" static %vardns1%
netsh interface ip add dns name="Local Area Connection" %vardns2% index=2

: to
ECHO This fanciness is brought to you by Kamal Roy IT-DEPT PH-9830132899!

:Exit
pause
exit


pause
  "


And then Run This file as administrator mode and then you choose your location code and then press Enter


Now Your Command Is Working Properly OK

List of Run Commands in Windows 7 and 8

In this article a complete list of Run Commands in Windows 7 and 8 . These commands allows to quickly access features and applications to customize operative system environment.
These run commands are available for almost all settings available in Windows control panel.
Note : most part of these commands are compatible with Windows 7, Vista e Windows XP.
As someone has kindly reported, some commands are not compatible between different versions. Please check the commands and use the correct ones for your version of the operating system. Technical feedback are always appreciated, please send me any info that it helpful to improve this article.

Used full run command
Function Command
Open Documents Folder documents
Open Videos folder videos
Open Downloads Folder downloads
Open Favorites Folder favorites
Open Recent Folder recent
Open Recent Folder logoff
Open Pictures Folder pictures
Windows Sideshow control.exe /name Microsoft.WindowsSideshow
Windows CardSpace control.exe /name Microsoft.cardspace
Windows Anytime Upgrade WindowsAnytimeUpgradeui
Taskbar and Start Menu control.exe /name Microsoft.TaskbarandStartMenu
Troubleshooting control.exe /name Microsoft.Troubleshooting
User Accounts control.exe /name Microsoft.UserAccounts
Adding a new Device devicepairingwizard
Add Hardware Wizard hdwwiz
Advanced User Accounts netplwiz
Advanced User Accounts azman.msc
Backup and Restore sdclt
Bluetooth File Transfer fsquirt
Calculator calc
Certificates certmgr.msc
Change Computer Performance Settings systempropertiesperformance
Change Data Execution Prevention Settings systempropertiesdataexecutionprevention
Change Data Execution Prevention Settings printui
Character Map charmap
ClearType Tuner cttune
Color Management colorcpl
Command Prompt cmd
Component Services comexp.msc
Component Services dcomcnfg
Computer Management compmgmt.msc
Computer Management compmgmtlauncher
Connessione proiettore di rete netproj
Connect to a Projector displayswitch
Control Panel control
Create A Shared Folder Wizard shrpubw
Create a System Repair Disc recdisc
Credential Backup and Restore Wizard credwiz
Data Execution Prevention systempropertiesdataexecutionprevention
Date and Time timedate.cpl
Default Location locationnotifications
Device Manager devmgmt.msc
Device Manager hdwwiz.cpl
Device Pairing Wizard devicepairingwizard
Diagnostics Troubleshooting Wizard msdt
Digitizer Calibration Tool tabcal
DirectX Diagnostic Tool dxdiag
Disk Cleanup cleanmgr
Disk Defragmenter dfrgui
Disk Management diskmgmt.msc
Display dpiscaling
Display Color Calibration dccw
Display Switch displayswitch
DPAPI Key Migration Wizard dpapimig
Driver Verifier Manager verifier
Ease of Access Center utilman
EFS Wizard rekeywiz
Event Viewer eventvwr.msc
Fax Cover Page Editor fxscover
File Signature Verification sigverif
Font Viewer fontview
Game Controllers joy.cpl
Getting Started gettingstarted
IExpress Wizard iexpress
Getting Started irprops.cpl
Install or Uninstall Display Languages lusrmgr
Internet Explorer iexplore
Internet Options inetcpl.cpl
iSCSI Initiator Configuration Tool iscsicpl
Language Pack Installer lpksetup
Local Group Policy Editor gpedit.msc
Local Security Policy secpol.msc
Local Users and Groups lusrmgr.msc
Location Activity locationnotifications
Magnifier magnify
Malicious Software Removal Tool mrt
Manage Your File Encryption Certificates rekeywiz
Math Input Panel mip
Microsoft Management Console mmc
Microsoft Support Diagnostic Tool msdt
Mouse main.cpl
NAP Client Configuration napclcfg.msc
Narrator narrator
Network Connections ncpa.cpl
New Scan Wizard wiaacmgr
Notepad notepad
ODBC Data Source Administrator odbcad32
ODBC Driver Configuration odbcconf
On-Screen Keyboard osk
Paint mspaint
Pen and Touch tabletpc.cpl
People Near Me collab.cpl
Performance Monitor perfmon.msc
Performance Options systempropertiesperformance
Phone and Modem telephon.cpl
Phone Dialer dialer
Power Options powercfg.cpl
Presentation Settings presentationsettings
Print Management printmanagement.msc
Printer Migration printbrmui
Printer User Interface printui
Private Character Editor eudcedit
Problem Steps Recorder psr
Programs and Features appwiz.cpl
Protected Content Migration dpapimig
Region and Language intl.cpl
Registry Editor regedit
Registry Editor 32 regedt32
Remote Access Phonebook rasphone
Remote Desktop Connection mstsc
Resource Monitor resmon
Resultant Set of Policy rsop.msc
SAM Lock Tool syskey
Screen Resolution desk.cpl
Securing the Windows Account Database syskey
Services services.msc
Set Program Access and Computer Defaults computerdefaults
Share Creation Wizard shrpubw
Shared Folders fsmgmt.msc
Snipping Tool snippingtool
Sound mmsys.cpl
Sound recorder soundrecorder
SQL Server Client Network Utility cliconfg
Sticky Notes stikynot
Stored User Names and Passwords credwiz
Sync Center mobsync
System Configuration msconfig
System Configuration Editor sysedit
System Information msinfo32
System Properties sysdm.cpl
System Properties (Advanced Tab) systempropertiesadvanced
System Properties (Computer Name Tab) systempropertiescomputername
System Properties (Hardware Tab) systempropertieshardware
System Properties (Remote Tab) systempropertiesremote
System Properties (System Protection Tab) systempropertiesprotection
System Restore rstrui
Task Manager taskmgr
Task Scheduler taskschd.msc
Trusted Platform Module (TPM) Management tpm.msc
User Account Control Settings useraccountcontrolsettings
Utility Manager utilman
Version Reporter Applet winver
Volume Mixer sndvol
Windows Action Center wscui.cpl
Windows Activation Client slui
Windows Anytime Upgrade Results windowsanytimeupgraderesults
Windows CardSpace infocardcpl.cpl
Windows Disc Image Burning Tool isoburn
Windows DVD Maker dvdmaker
Windows Easy Transfer migwiz
Windows Explorer explorer
Windows Fax and Scan wfs
Windows Features optionalfeatures
Windows Firewall firewall.cpl
Windows Firewall with Advanced Security wf.msc
Windows Journal journal
Windows Media Player wmplayer
Windows Memory Diagnostic Scheduler mdsched
Windows Mobility Center mblctr
Windows Picture Acquisition Wizard wiaacmgr
Windows PowerShell powershell
Windows PowerShell ISE powershell_ise
Windows Remote Assistance msra
Windows Repair Disc recdisc
Windows Script Host wscript
Windows Update wuapp
Windows Update Standalone Installer wusa
Versione Windows winver
WMI Management wmimgmt.msc
WordPad write
XPS Viewer xpsrchvw


Presented By Kamal 9830132899


Windows Server 2008 R2 0x80072F8F Windows Activation Error.

  The Windows activation error code 0x80072F8F may occurred while trying to activate Windows 7 or Windows Vista. As Microsoft says the error...